You can get lots of information on the subject of defragmentation in the following articles:
Best Practices
There are a few best practice recommendations to outline from the start.
Clean Up: Before you can organize, it is always best to do a quick clean up. This is also true with your Hard Disk Drive (HDD). If you stop to think about it, the defragment process works to organize scattered data caused from installing, modifying, and deleting files and software. Before doing a defrag is the best time to do a quick removal of junk items including files in the recycle bin, temp files (unwanted items that are created as temporary storage), outdated cache items, log files, and more. With even the free trial version of PC Clean Maestro you can do this quickly and easily.
Close Applications: It is best to close down any applications that are running. Software programs can be a challenge for Defrag tools as files are altered or created through regular program operations (even ones that occur behind the scenes from a running application).
Give it Time: We recommend leaving the PC alone during the defrag process. Not only will you experience poor system performance during this time (as the HDD is engaged in reorganizing data), but the act of changing files through the operations you make could be challenging for the defragmentation process as it has to deal with unexpected file and data revisions. It is best to shut down all running programs and run the Defrag tool in a “down time” such as late evening or at night. Having a Defrag scheduler is very handy in these cases and we will cover this at the end of this article.
Steps to Defrag
We have outlined four easy steps with screenshots to guide you easily through the defragmentation process.
- Clean up unwanted “junk” files
As stated above, we highly recommend cleaning all unwanted files with the use of PC Clean Maestro. The steps to take are easy – it involves scanning your PC, examining the list of detected items, and cleaning the items.
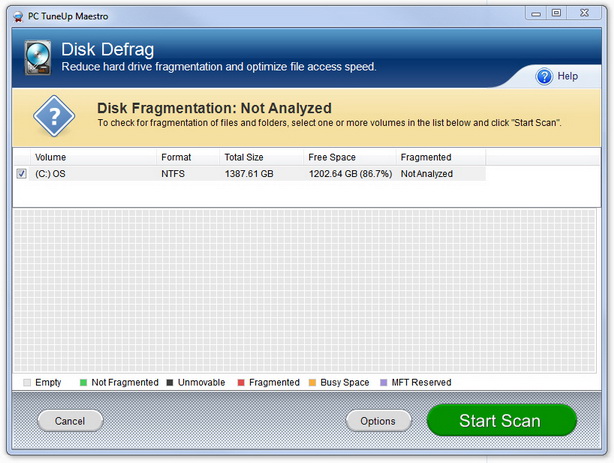
- Select the volume
You can select any and all volumes that are listed. In the case that your hard drive has several distinct partitions, each one will be displayed here. External drives and storage media devices (such as flash cards, USB sticks, external hard drives, etc.), are not included in the list of identified volumes. In the case of Solid State Drives (SSD), – these are data storage devices that employ integrated circuit assemblies as memory to store data in a persistent manner. They are also characterized by not having any moving mechanical parts and can often be found in laptops – PC TuneUp Maestro does not differentiate these from other volumes.

Recommendation: Do not include an SSD to be fragmented. These types of drives are not meant to be defragmented. Defragmentation will cause wear as additional writes are made to the flash cells which have a limited cycle life. Also, these drives experience very little fragmentation.
- Scan for fragmentation
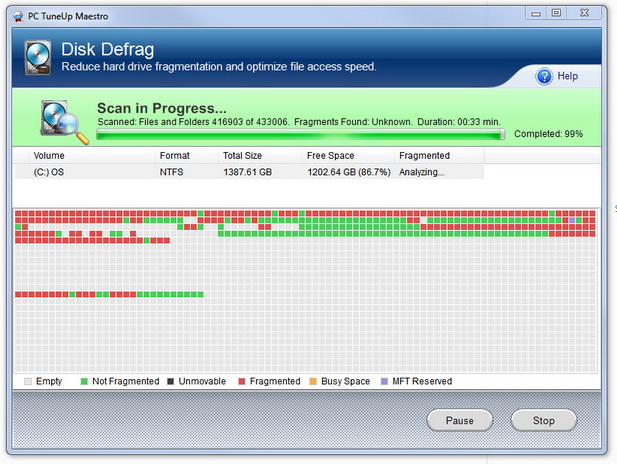
The first stage of defragmentation involves scanning the selected volume (or volumes) to assess the amount of fragmentation. In this way you can make an informed choice of whether to go ahead with the defrag process. When you are ready you can click the “Start” button. While the scan is being performed you can see a visual representation of the data secotrs on your disk. Each of these is assigned a color to identify it as empty, not fragmented, unmovable, fragmented, busy or reserved space.

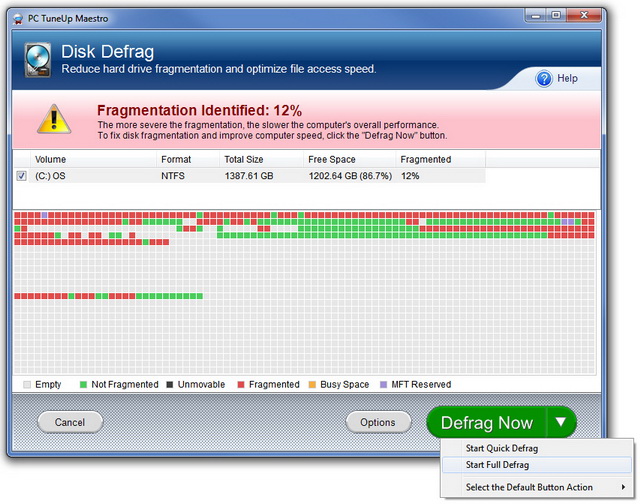
When the scan is complete the results are displayed. The most important piece of information is the overall percentage of fragmentation. If there are only a few percentages of fragmentation you can rest easy and run this process another time (in a few weeks for example). If more defragmentation is identified you need to continue to the next step. For a PC that has been in use a long time and has not been defragmented, you will likely experience considerable fragmentation.
One other point to mention… you need to examine how much free space is available. There is a column in the summary table that displays this as well. While many Defrag tools require 15% free space, PC TuneUp Maestro can get the job done with at least 3% free space. If you have very little free space (less than 3%), you need to re-visit step 1.
- Defrag – Quick and Full
You can now begin to defragment your HDD. You can click the “Defrag Now” button and the default action (Quick or Full Defrag) will initiate. Keep in mind that you can choose to perform a Quick or a Full Defrag and you can select which of these you want as the default action by using the drop down arrow (when you first run the program the default action is set to Full Defrag).

- Quick Defrag: You have the option of saving some time by performing a Quick Defrag – a good choice if there is a lot of available space, the percentage of fragmentation is low, and you do not have a lot of free “down” time and want to use your PC.When performing a Quick Defrag, PC TuneUp Maestro does not re-allocate free space on the volume in order to defrag items. The best example to visualize is having ten fragmented files and only three can be moved to areas where the free space already exists. It would be like having a picture puzzle and only moving joined pieces to free space rather than shuffling empty space to create larger free space.
- Full Defrag: This option is more thorough and will take more time. When performing a Full Defrag, PC TuneUp Maestro will re-allocate free space on the volume to get the job done. It would be like having a picture puzzle and efficiently organizing the free spaces so that all joined pieces can be moved to space that has been made available.The time this process takes depends on many factors including how defragmented the files are, how large the defragmented files are, and the number of files. Keep in mind the point made above: it is best to leave your PC alone during this process. You need to set aside some time for this to complete. If you want to perform the Full Defrag another time then cancel the procedure. Simply pick a time when you are away from the computer. You can even use the Disk Defrag Schedule to automate all of this.
Additional
You now have the fundamental knowledge required to perform defragmentation on your PC. There are only a few additional tips to pass along as you get better and better at performing this function.
- Regular Defrag – Frequency: How often to defragment your PC is going to depend on how often you and your family use your PC and what kind of activities are performed. If there is a lot of time being spent on the PC with a lot of installation of software and downloading and editing of large files (such as multi-media files), you will need to examine the fragmentation levels on a regular basis – maybe every week or two weeks. If you notice that you need to do this on a regular basis and would prefer to have this run when your PC is on and you are not using it, we recommend using the Schedule tool.
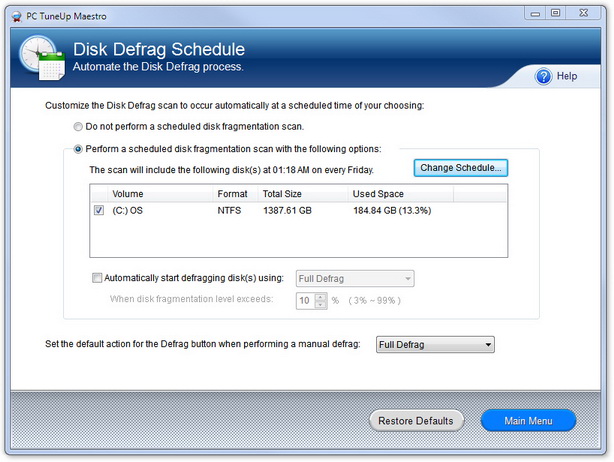
- Schedule / Automate: You can schedule PC TuneUp Maestro to run on a regular basis. There are several options you can set including which volume(s), what time of day, day of the week, and whether you would like to simply scan your PC to assess the defragmentation or you would like to have an automatic scan and defragmentation.
Now that you know the process of defragmentation, you are well underway to taking on one of the most influential steps in improving your PC performance – disk defragmentation. We plan on providing you even more PC optimization skills. It is our hope that this and future articles are useful to you and together we can optimize the functioning and overall health of you PC.


