 Introducing – PC Clean Maestro:
With PC Clean Maestro you can remove junk files and uninstall programs so as to free up space. By doing so you clear up PC clutter which can bog down the system and lead to poor system performance. We will provide two sets of instructions for the Clean tool and for the Uninstaller. Some best practices are provided so that your experience can be simplified and more trouble-free. Before we begin, let’s start with a best practice tip.
Best Practices:
Backup! This article deals with removal – permanent removal – of unwanted items. The key is “unwanted”. We strongly recommend that you make a copy of all files that are important to you. The price of external hard drives makes this a no-brainer. Today’s hard drives are often more gigabytes than the average person needs – and some are now terabyte in size (1,000 GBs). The added advantage of having a good backup and storage strategy is that you are working toward optimizing free space on your PC.
The Tools:
1. The Clean Tool
There are three areas of cleaning that can take place using the Clean Tool. We are staying focused on the free aspects of PC Clean Maestro. The following instructions detail how to remove junk files from your PC.
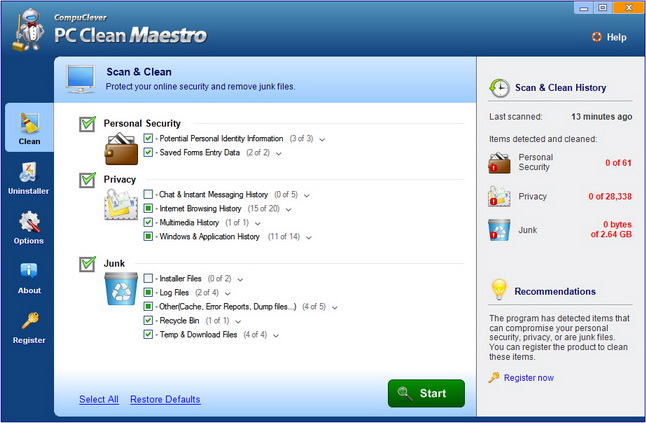
Step 1: First you need to open the program. The window will appear as seen here:

Step 2: Select items to clean. We are going to focus on junk items only so clear the checkboxes for Personal Security and Privacy. You can then review and select any of the items in the Junk section (Installer Files, Log Files, Temp Files, etc.).
Note: You can refer to the help file for instructions on how to display all the individual items that are categorized. You can also get information on the three state check box system.
Step 3: Initiate the scan using the “Start” button.
Step 4: Review and Clean. A summary of the scan is displayed including the number of detected items found in each category, the size that can be reclaimed, and a “Details” link. The link will provide the complete list of items found and the location of each item. You can clear any selected items before moving on to the next step.
Step 5: Clean. Click the “Clean” button to permanently delete these junk items.
Best Practices:
Create an automated schedule. Use the Options button in the Main window and select the Clean Scan Schedule. From here you can configure when you want an automated scheduled scan to run.
2. The Uninstaller
The second tool we are outlining in this article is designed to uninstall programs. As you will see, you also have the option of modifying and repairing certain applications. Let’s get started.
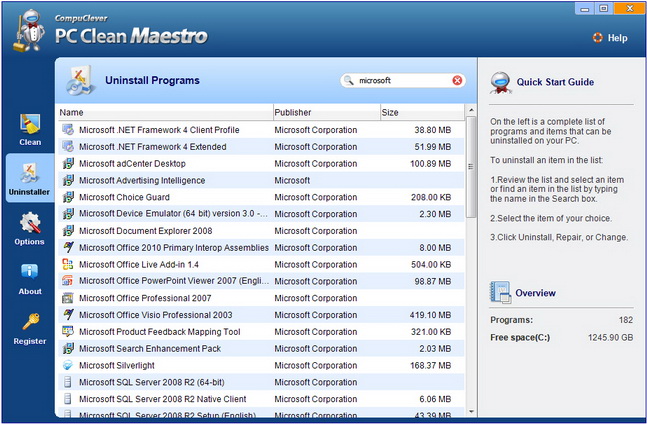
Step 1: Open the program and click the “Uninstaller” button in the navigation panel located on the left side. The window will appear as seen here:

Step2: Review the list. You can select items in the list and refer to the information that is displayed in the right panel.
Step 3: Select one of the available options in the right panel. In some cases an application will provide the options of “Repair” and “Change”. If you are certain you no longer use an application you can click the “Uninstall” button.
Note: This procedure cannot be undone. You would need to re-install the program to restore it to your PC.
Question Period:
How do I know if a program can be removed?
The rule of thumb is to only remove items you know are not required. For example, A third party application that is not part of the operating system and is rarely used can be removed without too much impact to you or the system.
There are a lot of Windows Driver Package items in my list. Can I remove them?
It is best not to remove Windows drivers as this can have an impact on how your computer and peripherals function. In most all cases these are not large in size and you would not gain much by removing them.
How do I know if a program is from a trusted source?
Select the item in the list and make sure that the manufacturer of the application (refer to the “Publisher” portion in the information panel on the right), is a trusted one.
Best Practices:
- Vigilance! Use caution when installing programs. Sometimes add-ons can come with programs and there are cases where you are not getting what you expect. Make sure to do your homework before you commit. Look for a digital signature from the manufacturer during installation. These are obtained from only a few security companies that issue digital signatures that go through rigid methods of testing. You can also perform Google searches to display objective customer reviews. Be careful that these are from valid sources. With a little effort you can better authenticate the validity of an application and the manufacturer of the program.
- We also recommend that you keep your programs up-to-date. Make sure to check that you are running secure programs with all the latest patches and updates.
