Thanks for choosing Digital Care ReadyBoost Disc, featuring Microsoft ReadyBoost technology. Before you start, please save all your documents and exit all running applications. Follow the steps below to install your Digital Care ReadyBoost Disc and optimize your PC.
Step 1. Insert the Digital Care ReadyBoost Disc to a USB slot of your choice.
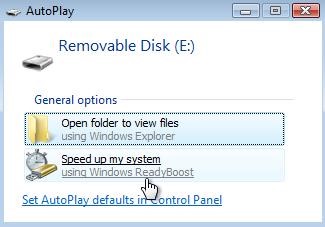
Step 2. If AutoPlay/AutoRun is enabled, you can click the Speed up my system using Windows ReadyBoost option.
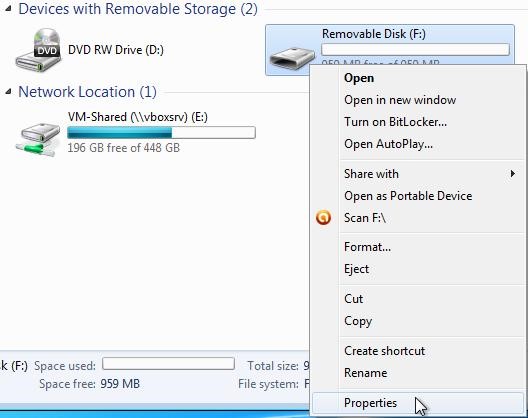
Alternatively, you can open Windows | File Explorer (or use keyboard shortcut: Windows Key + E), right-click the newly discovered removable drive and select Properties from the menu. Select the ReadyBoost tab from the Properties dialog box that appears.
If Windows states that “This device cannot be used for ReadyBoost – The device does not have the required performance characteristics for use in speeding up your system“, follow the instructions of Reformatting Your Digital Care ReadyBoost Disc below. And then come back to this step.
If Windows states that “ReadyBoost is not enabled because this computer is fast enough that ReadyBoost is unlikely to provide additional benefit“, this probably means that Windows is installed on an SSD and no performance gain is possible. Please contact our support team (support@paretologic.com) for further options of how to speed up your PC.
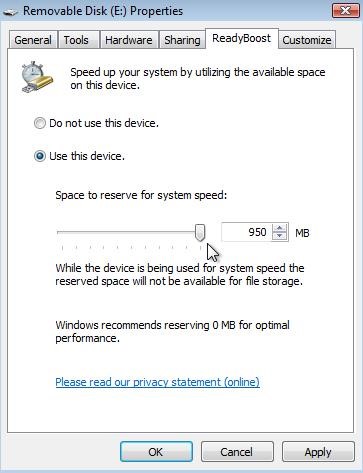
Step 3. If ReadyBoost options appear, you can use the device for speeding up Windows Vista, 7, 8/8.1 or 10.
In Windows Vista, enable the Use this device option and move the Space to reserve for system speed slider all the way to the right.
In Windows 7, 8, 8.1 and 10, select the Dedicate this device to ReadyBoost option.
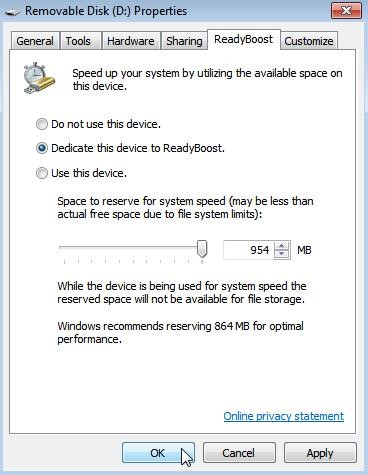
Click OK and your Digital Care ReadyBoost Disc device is ready!
Reformatting Your Digital Care ReadyBoost Disc
Occasionally, your Digital Care ReadyBoost Disc requires initial reformatting prior being used. Follow the steps below to format your drive.
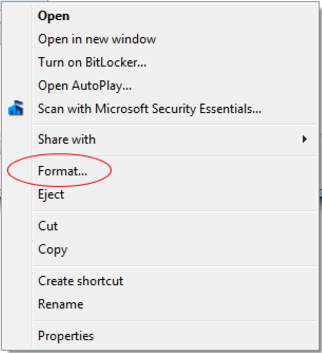
Step 1. Open Windows | File Explorer (or use keyboard shortcut: Windows Key + E), right-click the newly discovered removable drive and select Format.
Step 2. In File system dropdown menu, choose NTFS. In Allocation unit size, choose Default allocation size. And check Quick Format under Format options. Click Start.
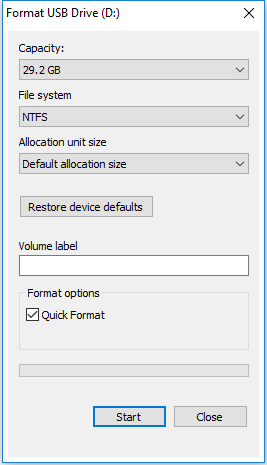
You will be notified once your Digital Care ReadyBoost Disc has been formatted and ready for being used. Simply follow the steps in the previous section to finish setting up your Digital Care ReadyBoost Disc.
Need Support or Help?
Email us at support@compuclever.com for more information and get help with using your Digital Care ReadyBoost Disc device.
