• Home
  • Products
  • Purchase
  • Support
  • Company

CompuClever Blog

Speed up Your PC with ReadyBoost

March 2, 2017 by Andy Thompson

All PC users have likely experienced the frustration related to slow performance.  There’s something just not right about having to wait for your PC to switch from one application to another.  We want to multi-task and we want a PC system that does not suffer any delays.  And, we ask, why not?  It’s an extension of what we are capable of.  So what are the choices in dealing with slow performing systems?  We can keep our original PC just as it is with very few applications (not taking full advantage of its capabilities and not much fun).  We can live with frustration and wait for the PC to respond when it is slow.  We can look at the costs associated with adding more RAM or increasing other hardware.  Instead of these options, we suggest a fast, easy, free alternative offered by Microsoft called ReadyBoost.

In our previous article we provided information about USB technology including USB flash drives.  With that information in hand you are ready to speed up your PC with ReadyBoost.  Let’s start with an overview of the technology.

Who Will Benefit?

Using this technology is best for users with 8 GB of RAM or lower, using a traditional spinning platter hard drive (HDD), and an operating system of Windows Vista or higher.

How to determine how much RAM you have:
Do one of the following:

  1. Open up your Computer window (Windows / File Explorer), locate: Computer (or “This PC”), right-click and select Properties.
  2. Open up the Control Panel and select: System and Security and in the “System” section select View amount of RAM and processor speed.

In the window that appears you can now view the specific operating system, the amount of physical memory (RAM), and other system information.

ReadyBoost will have little performance improvement or will be irrelevant if:

  • You already have a lot of RAM (> 16 GB) on your system
  • You are using a SSD drive.

The Technology:

From the many articles we have passed on to you in the past, you likely have a good idea that CompuClever programs such as PC TuneUp Maestro and PC Clean Maestro can regain performance that has been lost due to: defragmentation; clutter of junk files and unwanted applications (leading to the reduction of available space).  These tools can also assist you when faced with a bogged down Internet connectivity as well as using functions related to improving browser speed and startup speed.

Now we can shine some light on a technology that can take your PC as it is, and can extend its performance abilities.  Keep in mind we still recommend that you enhance your performance through regular clean up and maintenance.

The basics of the technology involve being able to cache data to a device.  In this case, the device is a USB flash drive.  You can also use CompactFlash and SD cards.  How it works is that data is temporarily stored on the flash drive so that it can be retrieved faster than using the internal hard drive and available memory (RAM or “Random Access Memory”).  Flash memory, such as a USB drive or SSD (Solid State Drive), benefit from faster seek times than standard magnetic hard disk drives.  The only limitation is that USB flash drives will wear out in time.  By some estimates[1] this won’t be for approximately 10 years.

Here’s How To:

You can begin by using a USB flash card that has at least 1 gigabyte (GB) of available space.  For best results, use a flash drive or flash memory card with at least double the amount of available space as the amount of memory (RAM) in your computer.[2]

Flash memory card specifications:

  • You can use a maximum of 32 GB of available space on any single removable storage device.
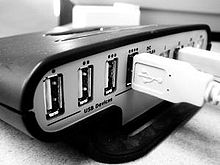
  • The USB flash drive must support USB 2.0 or higher and your computer must have at least one free USB 2.0 port to plug in the drive.  Note: ReadyBoost works best if you plug the flash drive into a USB port directly rather than an external USB hub shared with other USB devices.
  • Most memory cards work with ReadyBoost.  Different kinds of flash memory cards include CompactFlash and Secure Digital (SD).  Note: Some SD memory cards don’t work well with ReadyBoost due to issues with the SD card interface.  ReadyBoost displays a warning message in these cases.

To enable or disable ReadyBoost:

  1. Plug a USB flash drive or flash memory card into an available port.
  2. The Autoplay dialog box appears.  Under the General options, you can click Speed up my system.
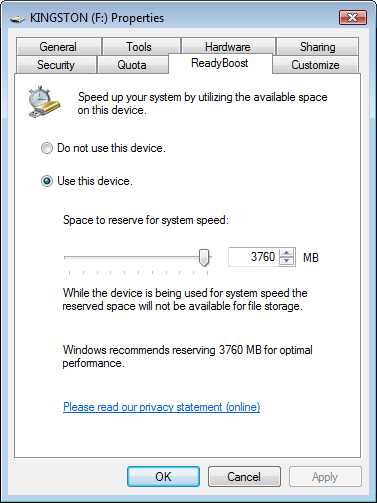
  3. The Properties dialog box opens.  Note: You can also access this dialog any time by opening the Computer window (Windows / File Explorer), right-clicking the drive, and selecting Properties.Next, click the tab: ReadyBoost.You can then do one of the following (as seen in the image here):
    • To turn ReadyBoost off, click: Do not use this device.
    • To use the maximum available space, click: Dedicate this device to ReadyBoost.  Windows will leave any files already stored on the device, but it’ll use the rest of the space to enhance system performance.
    • To use less than the maximum available space on the device, click Use this device, and then move the slider to choose the amount of available space on the device you want to use.
  4. Click OK.

Windows displays the recommended space to use for optimal performance.  If there isn’t enough space for ReadyBoost, a message is displayed telling you to free some space on the device.

The Benefits:

Our CompuClever team members have used ReadyBoost on a few systems that were so slow we faced having to replace them.  We noted significant gains in performance of these computers.  For systems that have only 2 or 4 GBs of RAM, the performance gains are significant.

We researched test results for ReadyBoost and found a very good site.  Here is a list of improvements as well as situations where there are no performance gains.

When enabling ReadyBoost on a system with low amounts of RAM, you can experience:

  • Opening media files like photos, music or video is slightly faster (approximately by 2%).
  • The loading of web pages and the use of Office applications is slightly faster (approximately by 2%).
  • Your system’s boot timings are improved (up to 7%).
  • Your most used applications start faster (by 10 to 15%).

This same site states:

You will not notice any difference with ReadyBoost enabled when you play games or you run applications that are CPU or GPU intensive.  Also the improvements get smaller when you add more RAM.  On a system with more than 4GB of RAM you will not notice anything getting better.  Also, adding an SSD drive to your computer means that there is no point in using ReadyBoost.  We’ve done some very quick tests after adding an SSD and we quickly noticed that ReadyBoost becomes irrelevant.

Ejecting Flash Drives:

It is good practice to eject flash drives that are in use.  This means closing windows and applications using the device and then using the Safely Remove Hardware icon.  In doing so, you eliminate the risk of losing data or experiencing data corruption – especially when files are being transferred.

To properly eject a drive:
Use the Safely Remove Hardware icon and eject your device before pulling it out of the USB port.
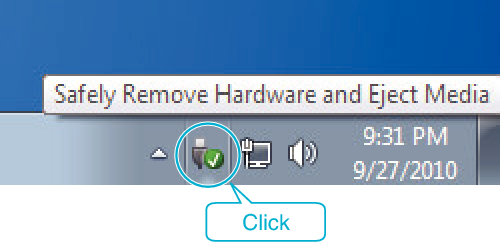
You can also locate the drive in the Computer window (Windows / File Explorer) right-click it, and select Eject.  Windows will tell you when it’s safe to remove the device thereby eliminating any chances of data corruption.

The exception:

In our research we found that:

Microsoft does not require ReadyBoost devices to be ejected before being removed. The ReadyBoost files are simply a cache for the real files being written to disk and removing the drive without ejecting does not harm the system.[3]

In fact, you can leave your ReadyBoost enabled drive inserted in the port and shutdown your system.  In this way, when you start up your PC you can also enhance startup time performance.

Summary:

There are few disadvantages to this free technology.  You need to dedicate a USB port for your drive (using a USB hub is possible but not preferred).  Also, your flash drive will eventually need to be replaced… but before that happens you’ll likely have purchased a new system entirely.  Cost is not really a factor though.  Flash memory drives are fairly inexpensive and certainly not as much as installing new hardware or buying a new system altogether.

Given all this, we strongly feel that ReadyBoost can extend the life of older PCs that are lacking the necessary RAM and are not able to keep up in a fast computing world.  We hope you enjoy the benefits as we have.

We will continue to provide story lines like this that benefit all of us and we will describe them in a manner that is within reach of everyday computer users.  If you have some ideas of topics you would like us to cover, email us at: newsletter@compuclever.com



[1] https://en.wikipedia.org/wiki/ReadyBoost
[2] http://windows.microsoft.com
[3] http://www.howtogeek.com/

Filed Under: computer fixes, improving performance, increasing speed, Newsletter, PC hardware, Uncategorized, Windows tips Tagged With: ReadyBoost, Speed, USB

The Key – USB

February 28, 2016 by Andy Thompson

“Can I get off at the next stop?”  It’s easy when you are on a bus, but not so simple when using computers.  The problem is the information highway is getting faster and trying to navigate can be frustrating.  We hope to make it easier with our upcoming series on USB technology and the functionality that is available.  We’ll get started on a description of USB in general, highlight differences between USB 2.0 and USB 3.0, speak about USB hubs, and then discuss the USB flash drive.

The Connection

Speaking of buses… in case you didn’t know, USB stands for Universal Serial Bus. USB has been around for a long time and it serves to standardize the connection, communication, and in some cases the power supply between a device and your PC.  USB is used for printers, cameras, keyboards, media players, as well as hard drive disks and flash drives.

In general, there are three basic kinds or sizes related to the USB connectors and types of established connection: the older “standard” size, in its USB 1.1, 2.0, and 3.0 variants (for example, on USB flash drives). [1]

USB Comparison

You are most likely dealing with USB 2.0 and USB 3.0 (as well as 3.1).  We’ll focus on these specifically.  The most significant difference between them is speed; the rate at which information can transfer from one device to another.  Compared to USB 2.0, USB 3.0 is about 10 times faster and USB 3.1 is about 20 times faster.  Along with being faster, USB 3.0 also has the ability to provide power if the device does not have a power connection of its own.

How to identify a USB port on your computer or PC:
There are three main ways to identify a USB 3.0 port: 

  1. Typically, if it is blue it is USB 3.0.  However, if it is not blue it could be USB 3.0 as the standard is quickly disappearing as USB 3.0 becomes more popular.
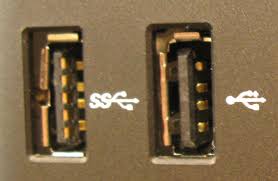
  2. The number of pins: A USB 3.0 port has 9 total pins. 5 in the front and the normal 4 in the back. You can shine a light into the port and if you see the 5 gold pins near the opening and 4 gold pins that are more recessed, you’ve got a USB 3.0 port. (See picture below: on the left is USB 3.0 and the right is USB 2.0).
  3. The symbol: SS stands for “Super Speed” and this also means you have a USB 3.0 port. [2]

How to identify a USB cable:
The cable connector for USB 3.0 is typically blue while USB 2.0 cable connectors are white.  Micro USB connectors look different and, in some cases, have an additional section added to it.  You can see these in the image below, second from the left. 

USB Cable and Repeaters:

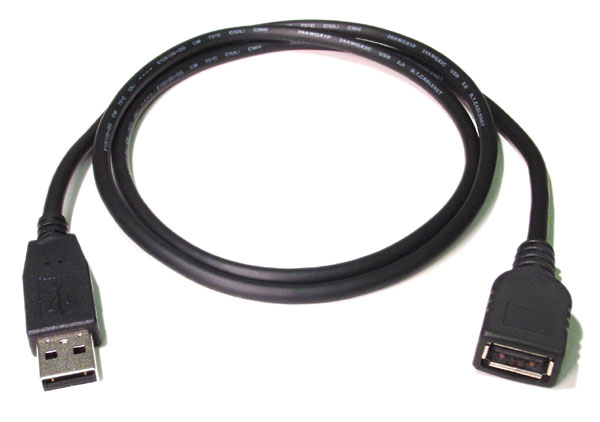
The maximum regular cable length for USB 2.0 is 16 feet 5 inches (5 meters) and for USB 3.0 it is 9 feet 10 inches (3 meters).  You can use active, also known as “repeater”, extension cables which are essentially one port USB hubs (as seen below).  For further information about cables we recommend you click the link to this site.

USB 3.0 – Do You Need It?

Is version 3 necessary for your needs?  It what situations will the speed advantage make a difference?  The answers are fairly straightforward.  The speed advantage gained by using USB 3.0 and 3.1 is useful when dealing with large files or with many files.  If you have a camera with a 32 GB memory stick in it and you take a lot of pictures, USB 3.0 / 3.1 will be much easier in transferring files.  If you use an external hard drive to back up your computer, using the fastest connection and devices will save you time.

Items like mice, keyboards, and your USB nick-nacks to keep your drink warm or cool can connect via USB 2.0 as the speed will mean nothing to these items.  For you serious gamers… plugging your mouse into a USB 3.0 port has no more benefit than 2.0.[3] If you print large files you may get some improvement in printing using USB 3.0 when printing large files, but for most home users getting prints faster is not a pressing need.

Backwards Compatibility

USB 3.0 and 3.1 are backwards compatible.  This means that they support 2.0 but that you will not benefit from the faster speeds available with version 3.  You can plug a USB 2.0 device into a 3.0 port, and a 3.0 device into a USB 2.0 port.  However, connection / transfer speeds will be at the slower rate.  So it is not a matter of needing to remember which device can be connected where, but realizing that you may not be getting the full benefits of the transfer speed.

Also, the cables connecting a USB 3.0 / 3.1 device need to support the standard or else you will be reduced to the slower speed.  The cables for USB version 3 have twice the amount of wire to be able to transfer the electrical current and support the higher transfer rate and thus are more expensive.  In most cases, devices come with the cables and are part of the cost.

USB Hub

A USB hub can expand one port to several so that you can plug in more than one device.  Laptops can come with several USB ports, and an external USB hub can “…consolidate several everyday devices (like a mouse and a printer) into a single hub to enable one-step attachment and removal of all the devices.” [4]

You need to keep in mind that a USB hub draws its power from the host computer’s interface.  This is referred to as a “bus-powered” hub.  There are self-powered hubs available as well that can provide full power to every port using an external power supply.  Rule of thumb is, if using a bus-powered hub and your device draws a lot of power, it is best to plug your device in a port directly to your PC.  Also keep in mind that if you are using a USB 2.0 hub in a USB 3.0 port, it will work but there is a data transfer bottleneck as you are not getting the full potential transfer speed.

USB 3.0 hubs will support USB 2.0 devices but the Super-Speed capability of 3.0 is, again, not achieved in these situations.  USB 3.0 also includes some power management, so when you have multiple devices connected via a USB 3.0 hub and the devices are drawing power from the hub, only the device in use will receive power so as to not waste power.

When Buying a USB Hub:
If you are going to get a USB hub you’ll need to choose from a non-powered hub and a self-powered hub.  If you decide to go with the former, you won’t have to plug it in so it is more mobile (good for laptops).  However, charging your devices through this kind of hub is not recommended and likely won’t work.  In fact some devices require power directly from the USB port or a self-powered hub to work. 

It is also best to buy one of the most current hubs that support USB 3.0 technology.  Even if your current PC doesn’t use USB 3.0, the next PC you get likely will.  For more information on buying a USB hub: click this link.

The Stick

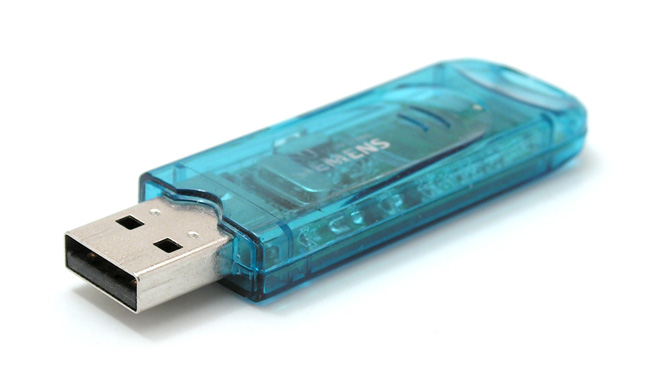
The USB flash drive is also known by many other names including: jump drive, data stick, pen drive, thumb drive, key chain drive, USB key, USB memory stick, and the list goes on.  It is a portable storage device as seen in the image presented here.

Here are the quick facts:

Size: It is about the size of a human thumb, thus the reference to thumb drive.

Storage Capacity:  When they first appeared they were about 8 MB in storage and now, in recent years the storage capacity has increased significantly and 8, 16, and 32 GB drives are common.  There are ones that are as large as 512 GB and 1 TB.

Connection:  It connects to a USB port.

Security:  You can easily lose these little items and they can easily be stolen.  There are third party disk encryption programs designed to protect your data.  As always, you need to back up any important data stored on these devices.

Uses:  Popular uses include data transport, storage of data, backup, and media storage but there are a wide number of uses including booting operating systems, running software programs, and for security – thus the name USB “keys” (or dongle or fobs).  USB flash drives can be inserted into stereo / audio players that support USB, and audio files can be played directly.

What is important to note is that these are an easy way to store and to transfer data.  They do not have any moving parts like an external hard disk drive, they use little power, and the data is safe from dust, shock, magnetic fields, and mechanical shock.  Some specially designed flash drives are even made to be waterproof and virtually unbreakable.

To Use it:
A flash drive can be used like any drive on your computer.  Start by inserting the flash drive into a front or back USB port or to a USB hub.  Once connected, open My Computer and you should see the drive labeled as “Removable Disk”, “Flash drive”, or as the manufacturer’s name.  Once the drive has been determined, you can copy any file you want and paste it into the flash drive or drag-and-drop the files to the flash drive.[5]

In Summary

Picking USB 3.0 or 3.1 devices depends largely on your demands for speedy transfers.  If you are not working with a lot of files or large files, then we recommend checking out the price point between USB 2.0 and more recent versions.  However, keep in mind that technology keeps getting better and if your PC doesn’t support 3.0 now, your next one likely will.

As for USB hubs, we recommend using them for connecting keyboard and mouse peripherals and other devices that do not require speed.  USB flash drives are really handy.  Just keep in mind that they can go missing or be stolen.  Back up and encrypt sensitive data.

We will continue to provide story lines like this that benefit all of us and we will describe them in a manner that is within reach of everyday computer users.  If you have some ideas of topics you would like us to cover, email us at: newsletter@compuclever.com


[1] https://en.wikipedia.org/wiki/USB
[2] http://helpdesk.nationalpaincare.com
[3] http://www.howtogeek.com
[4] https://en.wikipedia.org/wiki/USB_hub
[5] http://www.computerhope.com/jargon/j/jumpdriv.htm

Filed Under: Blog, PC hardware, Windows tips Tagged With: storage device, USB, USB Key

Don't miss out

Get a copy of "5 Tips for a Fast PC" when you sign up for our free "PC Tips" newsletter.

Subscribe Now
Archive Newsletter

Recent Posts

  • Ultra File Opener 5.7 Release Note

    Ultra File Opener 5.7 Release Note

    July 24, 2018
  • How Blue Light Affects Your Health and What to Do About It

    How Blue Light Affects Your Health and What to Do About It

    May 11, 2018
  • How to Protect Your Privacy & Identity on Facebook – Part 2

    How to Protect Your Privacy & Identity on Facebook – Part 2

    April 18, 2018
  • Facing the Truth – Facebook & Privacy

    Facing the Truth – Facebook & Privacy

    April 7, 2018
  • Spectre and Meltdown:  Massive Security Holes Impacting All Mac and PC devices

    Spectre and Meltdown: Massive Security Holes Impacting All Mac and PC devices

    January 12, 2018
  • How to Fix Computer Sound Problems

    How to Fix Computer Sound Problems

    December 19, 2017
  • Correct Ergonomics Sitting at a Computer Desk

    Correct Ergonomics Sitting at a Computer Desk

    November 17, 2017
  • Five Useful Tips and Tricks for Windows 10

    Five Useful Tips and Tricks for Windows 10

    August 27, 2017
  • Going Incognito – Browse Web in Privacy Mode

    Going Incognito – Browse Web in Privacy Mode

    August 4, 2017
  • Don’t be Held at Ransomeware

    Don’t be Held at Ransomeware

    July 14, 2017
Contact Us | Privacy Statement | Terms of Use | EULA | Partner With Us | Uninstall | Blog
CompuClever© Systems Inc. 2023 All rights reserved.
Microsoft is a trademark of the Microsoft group of companies. All other trademarks are the property of their respective owners.